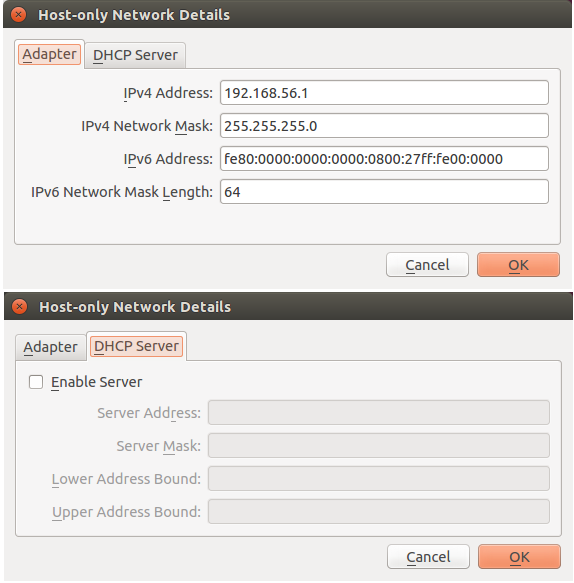
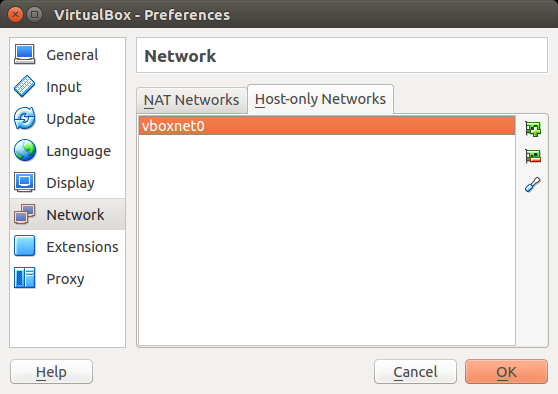
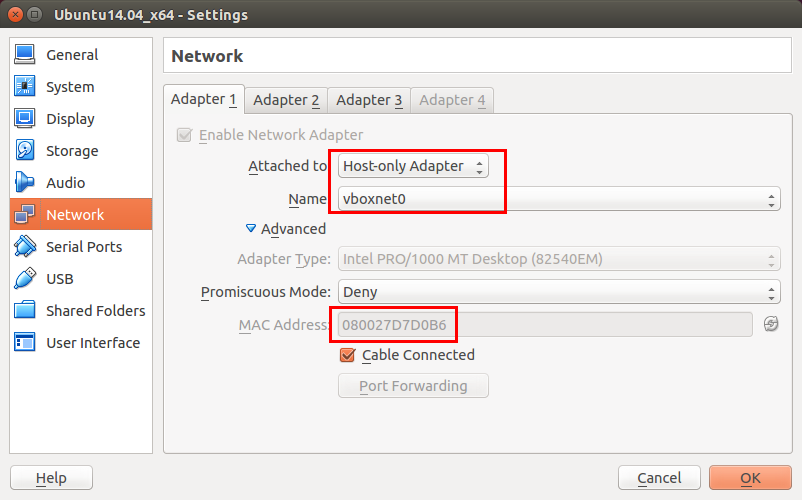
 第一个设置为了Host Only,用到了刚刚我们设置的Host Only适配器
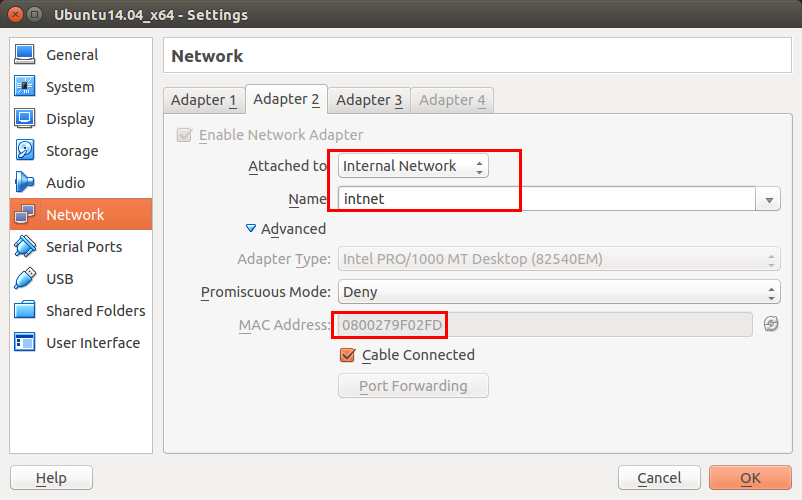 第二个设置的是内部网络,使虚拟机可以单独构成一个局域网.
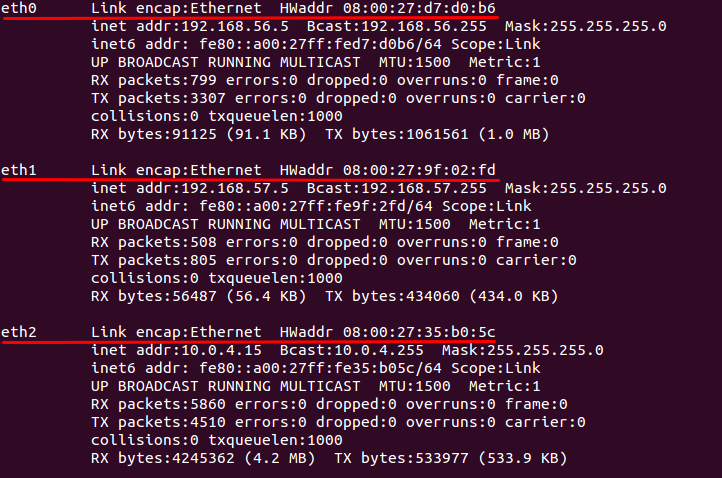
root@ishell:~# route
Kernel IP routing table
Destination     Gateway         Genmask         Flags Metric Ref    Use Iface
default         192.168.56.1    0.0.0.0         UG    0      0        0 eth0
10.0.4.0        *               255.255.255.0   U     1      0        0 eth2
192.168.56.0    *               255.255.255.0   U     1      0        0 eth0
192.168.57.0    *               255.255.255.0   U     1      0        0 eth1
默认网关也就是访问外网的居然时192.168.56.1,当然走不动了,那么默认网关应该设置成什么呢?按照下图打开网卡连接信息:
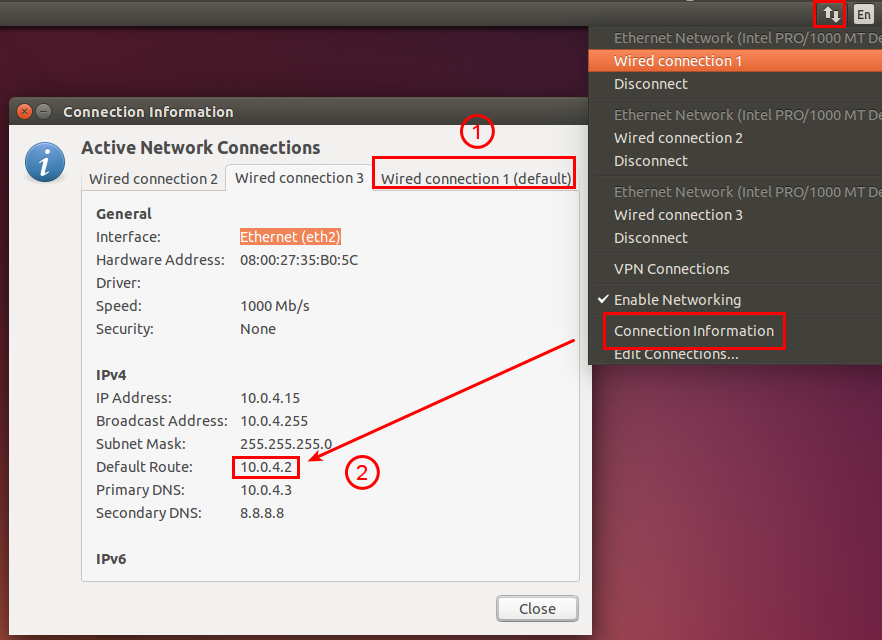
标记1处可以看到,默认网卡是eth0,因此默认网关随之也就设成该网卡的网关了,而我们需要的是通过网卡3(eth2)来访问,来看DHCP自动分配的信息, 如标记2处所示,默认路由网关为10.0.4.2,所以我们更改默认网关,并删除原默认网关.命令如下:
route add default gw 10.0.4.2 dev eth2
route del default gw 192.168.56.1
这个方法有一个缺点就是,如果重启网络服务或者重启电脑就需要重新设置一下.并不建议配置成永久的,这样可能会对日后其他网卡造成影响. 如果觉得麻烦,可以将上述两条命令写入一个脚本,加入环境变量,从命令行简单执行一下即可. 现在,ping一下百度,主机和虚拟机互ping一下192.168.56.1,应该也是能够ping通了.这说明虚拟机已经能够访问网络且和主机通信了.
上面是图形界面的设置,假如我们是服务器没有图形界面呢,或者说我们希望用图形界面来操作呢? 我新建立了一台 Ubuntu 16.04 x64 Server 的虚拟机,来配置一下.
首先进入虚拟机后,使用 ifconfig 看了一下 ip 地址:
enp0s3    Link encap:Ethernet  HWaddr 08:00:27:ac:d5:b9
          inet6 addr: fe80::a00:27ff:feac:d5b9/64 Scope:Link
          UP BROADCAST RUNNING MULTICAST  MTU:1500  Metric:1
          RX packets:0 errors:0 dropped:0 overruns:0 frame:0
          TX packets:113 errors:0 dropped:0 overruns:0 carrier:0
          collisions:0 txqueuelen:1000
          RX bytes:0 (0.0 B)  TX bytes:36558 (36.5 KB)

lo        Link encap:Local Loopback
          inet addr:127.0.0.1  Mask:255.0.0.0
          inet6 addr: ::1/128 Scope:Host
          UP LOOPBACK RUNNING  MTU:65536  Metric:1
          RX packets:0 errors:0 dropped:0 overruns:0 frame:0
          TX packets:0 errors:0 dropped:0 overruns:0 carrier:0
          collisions:0 txqueuelen:1
          RX bytes:0 (0.0 B)  TX bytes:0 (0.0 B)
可以看到任何 ip 地址没有配置正确.而且我们看到了一个奇怪的 enp0s3 , 这个是做什么的呢?这个就是网卡的名称.关于网卡的名称的确定,通常有如下五种策略:
- 首先检测是否能从固件或 BIOS 中得到板载网卡的索引号,如果可以就用这个作为网卡名称, 比如 eno1 ,它的全称应该是 Ethernet No 1.如果不行,则转到 2.
- 如果能够从固件或 BIOS 中得到网卡所在的 PCI 插槽的索引号,则用这个索引号命名. 比如 ens1 ,它的全称是 Ethernet Slot 1.如果不行,则转到 3.
- 如果能得到设备在物理位置上的连接信息,则用这个信息命名. 比如 enp2s0 ,它的全称是 Ethernet Peripheral 2 Slot 0.如果不行则尝试 4.
- 使用传统的内核命名方法,如 eth0 ,这种方法的命名是不可预知的, 也就是说, eth0 可能对应于第二块网卡,而 eth1 可能对应于第一块网卡.
- 也可以使用网卡的 MAC 地址来命名,如: enx78e7d1ea46da ,通常不用这种方法.
我们有多种方法来看网卡信息.第一种使用 lscpi 来得到 PCI 上的网卡,下面是虚拟机中的输出:
00:00.0 Host bridge: Intel Corporation 440FX - 82441FX PMC [Natoma] (rev 02)
00:01.0 ISA bridge: Intel Corporation 82371SB PIIX3 ISA [Natoma/Triton II]
00:01.1 IDE interface: Intel Corporation 82371AB/EB/MB PIIX4 IDE (rev 01)
00:02.0 VGA compatible controller: InnoTek Systemberatung GmbH VirtualBox Graphics Adapter
00:03.0 Ethernet controller: Intel Corporation 82540EM Gigabit Ethernet Controller (rev 02)
00:04.0 System peripheral: InnoTek Systemberatung GmbH VirtualBox Guest Service
00:05.0 Multimedia audio controller: Intel Corporation 82801AA AC'97 Audio Controller (rev 01)
00:06.0 USB controller: Apple Inc. KeyLargo/Intrepid USB
00:07.0 Bridge: Intel Corporation 82371AB/EB/MB PIIX4 ACPI (rev 08)
00:08.0 Ethernet controller: Intel Corporation 82540EM Gigabit Ethernet Controller (rev 02)
00:09.0 Ethernet controller: Intel Corporation 82540EM Gigabit Ethernet Controller (rev 02)
00:0b.0 USB controller: Intel Corporation 82801FB/FBM/FR/FW/FRW (ICH6 Family) USB2 EHCI Controller
00:0d.0 SATA controller: Intel Corporation 82801HM/HEM (ICH8M/ICH8M-E) SATA Controller [AHCI mode] (rev 02)
输出的格式是 这样的, 以第一行为例, 00:00.0 通常用 D/B/F 来指代, 也就是设备(Devices:1 byte),总线(Bus:5 bits),功能(Function:3 bits),接着的是设备名称 Host Bridge, 然后是型号 Intel Corporation 440FX - 82441FX PMC [Natoma],最后是版本信息 (rev 02) . 这里我们可以看到有三块 PCI 网卡,这时候操作系统将会分别以 enp0s3,enp0s8,enp0s9 来对其命名.为了验证这个想法,让我们祭出 lshw -C network | less 命令.输出如下:
*-network:0
     description: Ethernet interface
     product: 82540EM Gigabit Ethernet Controller
     vendor: Intel Corporation
     physical id: 3
     bus info: pci@0000:00:03.0
     logical name: enp0s3
     version: 02
     serial: 08:00:27:ac:d5:b9
     size: 1Gbit/s
     capacity: 1Gbit/s
     width: 32 bits
     clock: 66MHz
     capabilities: pm pcix bus_master cap_list ethernet physical tp 10bt 10bt-fd 100bt 100bt-fd 1000bt-fd autonegotiation
     configuration: autonegotiation=on broadcast=yes driver=e1000 driverversion=7.3.21-k8-NAPI duplex=full latency=64 link=yes mingnt=255 multicast=yes port=twisted pair speed=1Gbit/s
     resources: irq:19 memory:f0000000-f001ffff ioport:d010(size=8)
*-network:1 DISABLED
     description: Ethernet interface
     product: 82540EM Gigabit Ethernet Controller
     vendor: Intel Corporation
     physical id: 8
     bus info: pci@0000:00:08.0
     logical name: enp0s8
     version: 02
     serial: 08:00:27:6b:7e:5e
     size: 1Gbit/s
     capacity: 1Gbit/s
     width: 32 bits
     clock: 66MHz
     capabilities: pm pcix bus_master cap_list ethernet physical tp 10bt 10bt-fd 100bt 100bt-fd 1000bt-fd autonegotiation
     configuration: autonegotiation=on broadcast=yes driver=e1000 driverversion=7.3.21-k8-NAPI duplex=full latency=64 link=no mingnt=255 multicast=yes port=twisted pair speed=1Gbit/s
     resources: irq:16 memory:f0820000-f083ffff ioport:d240(size=8)
*-network:2 DISABLED
     description: Ethernet interface
     product: 82540EM Gigabit Ethernet Controller
     vendor: Intel Corporation
     physical id: 9
     bus info: pci@0000:00:09.0
     logical name: enp0s9
     version: 02
     serial: 08:00:27:f3:ba:59
     size: 1Gbit/s
     capacity: 1Gbit/s
     width: 32 bits
     clock: 66MHz
     capabilities: pm pcix bus_master cap_list ethernet physical tp 10bt 10bt-fd 100bt 100bt-fd 1000bt-fd autonegotiation
     configuration: autonegotiation=on broadcast=yes driver=e1000 driverversion=7.3.21-k8-NAPI duplex=full latency=64 link=no mingnt=255 multicast=yes port=twisted pair speed=1Gbit/s
     resources: irq:17 memory:f0840000-f085ffff ioport:d248(size=8)
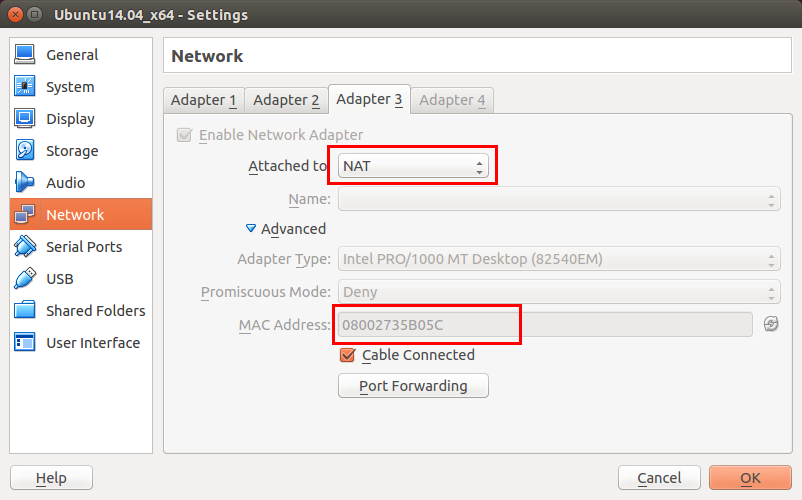
我们可以看到 PCI 网卡1 ,2 都被禁用了,网卡 0 也没有配置.现在我们来配置它们. 上面的网卡序列号对应于 VirtualBox 中的适配器 MAC 地址,由于我是在另一台电脑上配置的虚拟机中的服务器. 所以和前面截图中的适配器 MAC 地址不同,这个需要注意一下,实际上它们应该是一一对应的. 第一个网卡是 Host-Only ,第二个网卡是 Internal Network,第三个是 NAT. vim /etc/network/interfaces,依次的我们配置三个网卡如下:
auto enp0s3
iface enp0s3 inet static
address 192.168.56.5
netmask 255.255.255.0
network 192.168.56.0
broadcast 192.168.56.255
gateway 192.168.56.1
post-up route del default dev enp0s3

auto enp0s8
iface enp0s8 inet static
address 192.168.57.5
netmask 255.255.255.0
network 192.168.57.0
broadcast 192.168.57.255
post-up route del default dev enp0s8

auto enp0s9
iface enp0s9 inet dhcp
上面的命令我用 route del 删除了上面的两个默认网关, 这样的话使得虚拟机能访问外网(尽管这和 Host-Only 的理念相悖,但是我并不是想真的建立一个Host-Only 的网络), 即让默认网关是 NAT 网卡上自动获取的网关.然后执行下面的命令重启网络配置:
sudo /etc/init.d/networking stop
sudo /etc/init.d/networking start
这个时候,应该可以在虚拟机和主机之间互ping了,而且虚拟机也能够访问外网了. 如果主机不能 ping 通虚拟机,可以在主机上添加一下路由规则:
sudo route add -net 10.0.4.0 netmask 255.255.255.0 dev vboxnet0
意思就是当主机访问网络 10.0.4.0,默认个网络掩码是 255.255.255.0时, 将会通过设备 vboxnet0 进行访问.这样就可以 ping 通虚拟机了.
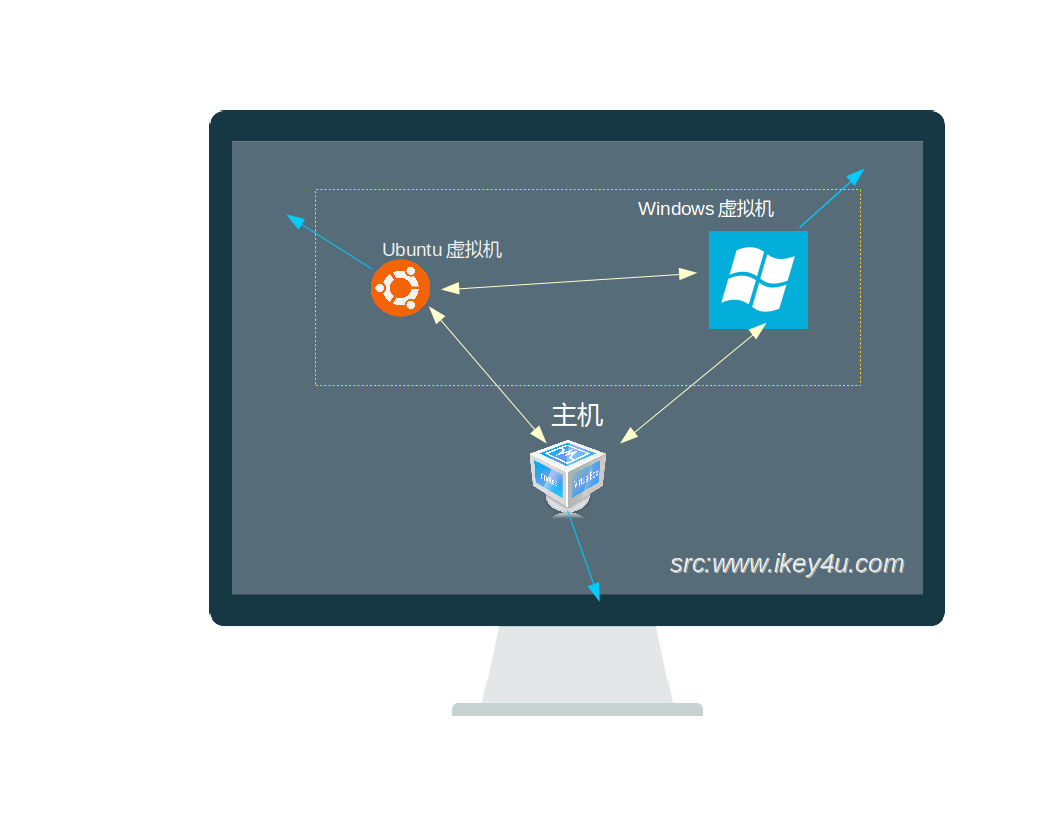
接下来我们来设置Windows虚拟机.类似的,关闭虚拟机,在 VirtualBox 中转到虚拟机的网络设置上, 设置三个适配器,然后打开虚拟机,我们需要知道VMBox的adapter映射到了虚拟机中的那张网卡上: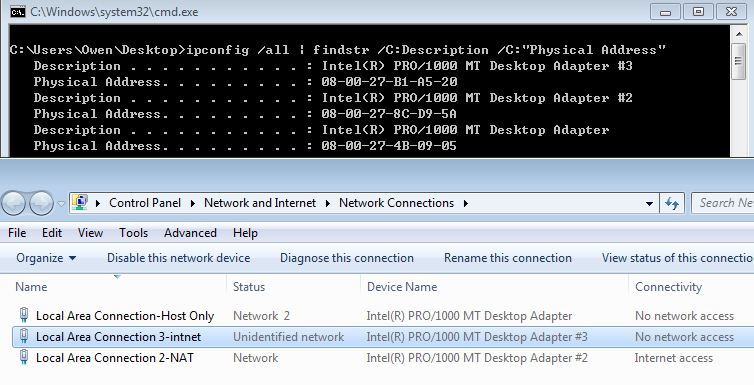
如上图,为了方便,我在原有的网卡名称后面加上了对应的标记.配置都是类似的如下:
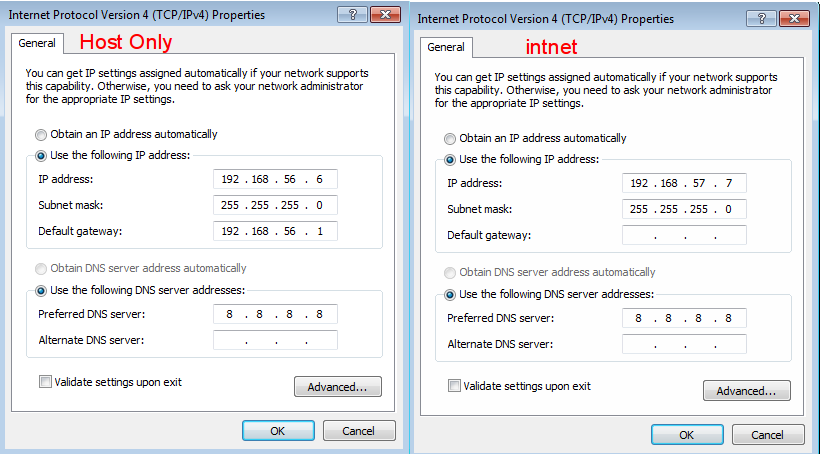
对于NAT,留其默认即可. 最后互ping测试,此处从略.我按照以上步骤配置是没有问题的.
Reference:
- http://www.it610.com/article/1716615.htm
- http://maykiller.com/2012/virtualbox-set-network-to-access/
- http://www.php-note.com/article/detail/89
- http://xintq.net/2014/09/05/virtualbox/
- http://yeejlan.github.io/2014/07/31/config-virtualbox-vm-to-enable-both-internet-and-local-network-access/